February 24th, 2026
Attik Update - Manual Send Emails, Contact Role Variables & Reports Hub AI Assistant
Summary
You can send an email from a template directly on the work order, with a preview and full control over who receives it, including one-off addresses.
Contact role variables in email and SMS templates let you pull the right name and details for each role (e.g. client, client's agent, listing agent).
Images can be added to email templates and render with consistent sizing and styling in the builder and in sent emails.
Access to the Reports Hub is now controlled by a permission and when selected accessible from the side menu by clicking the ‘Data Exports’ option.
An AI Assistant has been added to the Reports Hub to help create your desired report output using natural language.
New Features
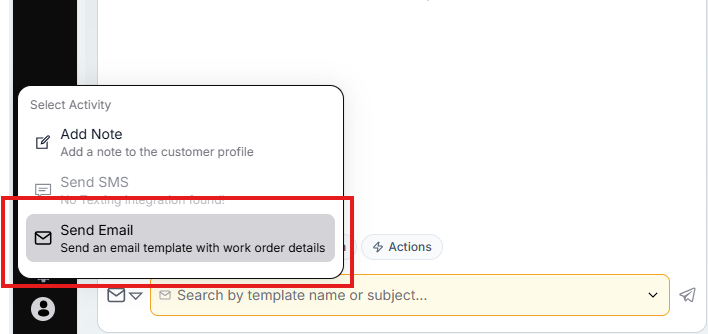
Action Flow: Manual Email Preview, Edit & Send
What changed: You can send an email from a template on the work order, see a preview before sending, and choose recipients (To, CC, Bcc). You can add custom email addresses that are not on the order.
Before: Emails were sent only by automations; recipients were limited to contact roles on the order.
Now: From the work order you can preview a template email, send it, and add or change recipients—including one-off addresses.
Preview Email from Activity Screen:

Choose recipient(s):

Edit template text & send email:

Why it matters: Faster follow-up and more flexible communication without leaving the work order.
Email Templates: Contact Role Variables
What changed: Email and SMS templates (and agreements) now support variables that pull from a specific contact role so the right name and details appear in the right place.
Before: Template variables were not role-specific.
Now: Templates can use role-specific variables (e.g. client's name, listing agent's email) for clearer, targeted messages.

Why it matters: Fewer wrong-name or wrong-role mistakes in templates.
AI Report Assistant in the Reports Hub
What changed: When you create or edit a custom report in the Reports Hub, you can open the AI Report Assistant in a chat-style window to describe the report you want in plain language. You can apply that configuration to the report form with one click, run the report, or keep chatting to add filters, change the sort order, add a pivot, and so on. If you already have a report open, you can ask the assistant to change it and it will update the configuration accordingly.
Before: Report configuration had to be done entirely by hand. You chose the entity, columns, filters, aggregation, and sort order yourself by filling out the form step by step.
Now: You can describe the report you want in natural language, and the AI suggests a complete configuration. You apply it to the form, make any tweaks you want (either in the form or by sending follow-up messages in the chat), and then save and run the report.

Why it matters: Setting up one-off and recurring reports is faster, especially if you prefer to describe what you want rather than clicking through every option in the form.
Improvements
Reports Hub now Available in Menu
What changed: The Reports Hub can now be set as a permission so users can access this feature vis the side menu.
Before: The Reports Hub was only accessible through a URL.
Now: Those with the permission can access the Reports hub by choosing the ‘Data Export’ option on the left hand menu

Why it matters: The Reports hub provides users with access to report on all the data stored in Attik.
Booked Jobs: Option to Create as Confirmed
What changed: Companies can turn on a single setting so that every new booked job—whether created online by a client or internally by your team—is created as confirmed instead of unconfirmed. When the setting is on, new jobs land as "scheduled and done" without a separate confirm step.
Before: Every new inspection was created as unconfirmed. Staff or clients had to complete a confirm step before the job was treated as confirmed.
Now: In scheduling settings you can turn on "Create booked jobs as confirmed." With this on, all new booked jobs (online and internal) are created as confirmed. The setting applies everywhere jobs are created, so the behavior is consistent. Companies that still want a confirm step can leave the setting off.

Why it matters: Teams that don't need a separate confirm step can avoid it entirely. Those that do can keep the current flow. The choice is per company and applies to every booking source.
Inspector Teams: Multiple Teams per Inspector
What changed: Inspectors can now be assigned to more than one inspector team. Calendar filtering by team, payroll and team bonuses, and the settings UI all support inspectors who belong to multiple teams.
Before: Each inspector could be in only one inspector team. If you wanted to group people by region and by specialty, you had to choose one or the other.
Now: You can add an inspector to as many teams as you need. They appear in calendar filters for each of their teams and are counted correctly for payroll and team bonuses. In Settings, you add or remove team membership per team; an inspector can be a member of several teams at once.
Why it matters: Managers can organize and filter inspectors in different ways—for example by region and by specialty—without being blocked by a single-team limit.
Bug Fixes
Service Area: Invalid Polygon Error
What changed: Saving or editing certain service areas could show an "invalid polygon" error even when the drawn shape was valid. The system now validates and normalizes polygon rings correctly so valid areas save without errors.
Before: Editing some service areas could block save with an invalid polygon message.
Now: Valid polygon boundaries are accepted and saved; the system checks closure and normalizes coordinates so you are not blocked by false errors.
Why it matters: Schedulers and admins can update service areas without being blocked by incorrect validation.
Calendar: New Event Button No Longer Covers Save
What changed: After you move events on the calendar by drag-and-drop, a "Save X Change(s)" button appears so you can persist those changes. That button was sometimes covered by the "New Event" button in the bottom-right. The layout and stacking have been adjusted so the save control stays visible and clickable.
Before: When you had unsaved drag-and-drop changes, the New Event (Add Event) control could sit on top of the save button. You couldn't click save and could assume your changes were lost or that the UI was broken.
Now: The save control remains visible and clickable when you have unsaved calendar changes. The Add Event icon is still available and no longer covers the save action.
Why it matters: You can reliably save drag-and-drop calendar changes without hunting for the button or worrying that it's hidden.
Discount Codes: Automatic Expiration
What changed: Discount codes that have passed their end date are now automatically set to Inactive. Expired codes are no longer shown as active in the discount code list, so staff don't see or use them by mistake.
Before: Codes that had passed their end date stayed active until someone manually marked them inactive. Staff could still see and use expired codes, which led to confusion and manual cleanup.
Now: The system automatically deactivates codes when their end date has passed. The discount code list reflects only valid, active codes (or your chosen filters). Staff no longer need to deactivate expired codes by hand.
Why it matters: Staff see only valid, active codes and are less likely to offer or apply expired promotions. Manual cleanup of old codes is no longer required.